
Troubleshooting Wire Feed Problems: A Comprehensive Guide for Welders
April 7, 2025 7:45 pmConsistent wire feeding is crucial for high-quality welds in Gas Metal Arc Welding (GMAW) and Flux-Cored Arc Welding (FCAW) processes. Deviations from this consistency affect the final weldment’s integrity and aesthetics. Wire feed problems can cause operational disruptions for welders, affecting productivity and frustration. This guide offers a structured approach to identify symptoms, understand root causes, and troubleshoot wire feed difficulties, enhancing weld quality, operational efficiency, and reducing downtime.
Common Symptoms of Wire Feed Problems
Identifying inconsistent wire feeding signs is crucial for diagnosis and resolution. Several indicators indicate a wire delivery system issue, disrupting wire travel from spool to arc.
- Erratic Arc Behaviour
An unstable or fluctuating arc is often a primary symptom. The arc may sputter, flare excessively, or extinguish intermittently. This inconsistency arises because the wire feed speed does not match the preset parameters or the welder’s travel speed, leading to variations in the arc length and electrical characteristics. This directly compromises weld pool control and fusion quality.
- Wire “Birdnesting” at Drive Rolls
This term describes the tangling of wire between the drive rolls and the inlet guide of the gun liner. It occurs when the wire encounters excessive resistance downstream (e.g., in the liner or contact tip) but the drive rolls continue to push. The wire buckles and wraps around the rolls, causing an immediate stoppage and requiring time-consuming clearing and potential wire wastage.
- Inconsistent Weld Bead Appearance
Wire feed irregularities often result in a weld bead that varies significantly in width, height, and overall profile. Sections may appear excessively convex (“ropy”) due to insufficient wire feed, or concave with poor fill due to excessive feed relative to travel speed. Such inconsistencies indicate fluctuating filler metal deposition rates, compromising the structural integrity and visual acceptance of the weld.
- Audible Wire Slipping at Drive Rolls
A noticeable clicking or slipping sound from the wire feeder unit often indicates that the drive rolls are failing to grip the wire properly. This might be due to insufficient drive roll tension, incorrect roll profile or size, or greasy/oily wire. The wire feed becomes intermittent, mirroring the slipping action, leading directly to poor arc stability and weld defects.
- Contact Tip Burnback
Burnback occurs when the wire fuses inside the contact tip, usually caused by the wire momentarily stopping or slowing significantly while the welding current remains active. This melts the wire back into the tip orifice, blocking further feeding. It frequently results from downstream restrictions, inadequate electrical stick-out, or drive roll slippage causing a temporary halt in wire delivery.
- Wire Stoppages or Hesitation
The wire feed may stop completely or exhibit noticeable hesitation during welding without obvious birdnesting. This points to significant friction or obstruction somewhere along the wire’s path. Potential causes include severely kinked liners, clogged contact tips, incorrect liner trim length, or problems with the wire spool itself, such as tangles or excessive braking tension.
- Porosity or Inclusions in the Weld
While often linked to gas coverage issues, severe wire feed inconsistency can contribute to porosity. An erratic arc resulting from poor feeding can disturb the shielding gas envelope, allowing atmospheric contamination. Furthermore, inconsistent metal transfer can trap oxides or slag, especially if the feed problem causes the wire to stub into the puddle erratically.
Potential Causes of Wire Feed Problems
Understanding wire feed issues’ root causes is crucial for effective troubleshooting and prevention, ranging from mechanical issues to improper setup or consumable wear.
- Incorrect Drive Roll Tension
If the tension on the drive rolls is too loose, the rolls will slip on the wire, causing intermittent or inconsistent feeding. If the tension is too tight, it can deform or crush the wire, increasing friction as it passes through the liner and potentially leading to jams or birdnesting.
- Wrong Drive Roll Size or Type
Using drive rolls that do not match the diameter of the welding wire prevents proper grip. Furthermore, using the incorrect groove profile (e.g., a V-groove for a soft flux-cored wire instead of a U-groove, or smooth rolls for metal-cored wire needing knurled rolls) can lead to wire deformation or insufficient traction, both resulting in poor feeding.
- Worn, Kinked, or Clogged Gun Liner
The liner guides the wire through the gun cable. Over time, it accumulates metal shavings, dirt, and lubricant residue, increasing friction. Physical damage like kinks or sharp bends drastically impedes wire travel. Using an incorrectly sized liner also causes feeding problems. A compromised liner is one of the most frequent causes of wire feed issues.
- Incorrect Contact Tip Size or Worn Tip
The contact tip guides the wire into the arc. If the tip’s internal diameter is too small for the wire, friction will be excessive. If it’s too large (or worn oval), the wire can wander, causing poor electrical contact, micro-arcing inside the tip, and potential burnback or jamming. A clogged tip will block the wire entirely.
- Poor Gun Cable Management / Kinks
Sharp bends, tight loops, or excessive coiling in the welding gun cable significantly increase the frictional resistance the wire encounters as it travels through the liner. Maintaining the straightest possible path for the cable from the feeder to the workpiece is essential for smooth wire feeding, especially with softer wires or longer cables.
Step-by-Step Troubleshooting Guide
A systematic approach to diagnosing wire feed problems, starting with common issues, progressing to complex causes, minimizes downtime, and ensures safety before inspecting or adjusting components.
- Step 1: Check Consumables (Tip, Nozzle, Diffuser)
Begin at the torch end. Remove the nozzle and inspect the contact tip. Verify it is the correct size for the wire diameter being used. Check the tip’s internal bore for wear (ovality) or blockage. Replace if worn, damaged, or clogged. Ensure the gas diffuser (if applicable) is clean and correctly installed.
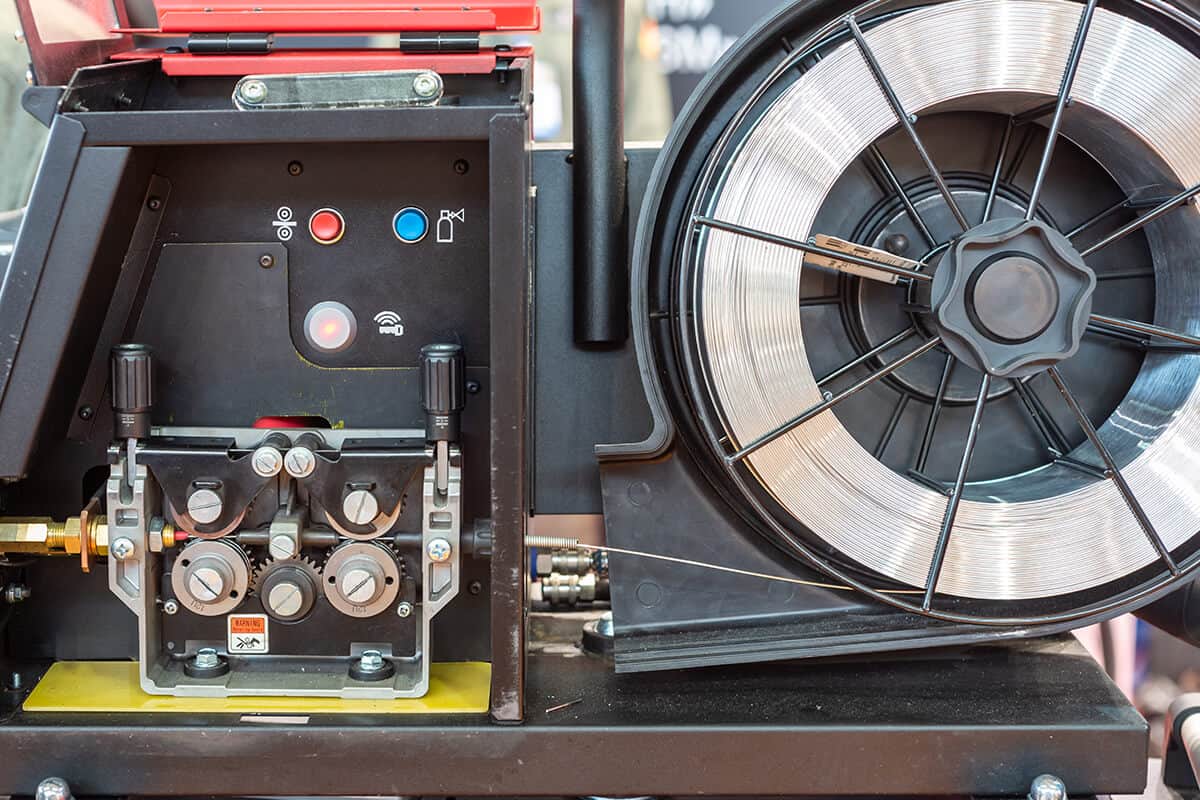
- Step 2: Inspect Drive Rolls and Tension
Open the wire feeder cabinet. Check that the drive rolls match the wire diameter and type (V-groove, U-groove, knurled). Inspect the grooves for wear or debris; clean or replace as needed. Release the tension arm, feed some wire, and check the drive roll tension. Adjust according to manufacturer recommendations – generally, just tight enough to feed consistently without deforming the wire.
- Step 3: Examine Wire Spool and Inlet Guide
Inspect the wire spool installation. Ensure the hub tension is correctly set – it should provide slight resistance to prevent overrun but allow smooth payoff. Check the wire path from the spool to the drive rolls, ensuring it aligns properly with the inlet guide tube. Look for any visible wire tangles or damage on the spool surface.
- Step 4: Assess the Gun Liner Condition
Disconnect the gun from the feeder. Visually inspect the exposed end of the liner for kinks, debris, or incorrect trimming (it should typically be slightly recessed within the gun connector). Attempt to blow compressed air through the liner (from the gun end towards the feeder end) to check for blockages. Significant resistance indicates a clogged or damaged liner needing replacement.
- Step 5: Evaluate Gun Cable Position
Lay the welding gun cable out as straight as possible, removing any tight coils or sharp bends. Attempt to feed wire manually (using the feeder’s jog/inch button) while observing the drive rolls. If feeding improves significantly with the cable straightened, excessive cable bending was likely contributing significantly to the resistance. Encourage maintaining a straighter cable path during operation.
- Step 6: Verify Wire Quality and Condition
Examine the welding wire itself. Check for any signs of rust, dirt, excessive surface lubricant, or physical damage like kinks or flat spots. Wipe a section of wire with a clean cloth to check for contaminants. If the wire quality is suspect, try a different spool from a reputable manufacturer to rule out wire-related issues.
- Step 7: Confirm Machine Settings and Wire Compatibility
Double-check that the wire feed speed and voltage settings on the welding machine are appropriate for the application, wire type, and diameter. Ensure the chosen wire is compatible with the shielding gas being used and the base material. Grossly mismatched parameters, while not a direct feed mechanism issue, can sometimes manifest symptoms mistaken for feed problems (e.g., excessive burnback).
Prevention Tips to Minimize Wire Feed Issues
Regular maintenance and best practices can significantly reduce wire feed issues, save time, reduce waste, and ensure high-quality welds, thereby enhancing equipment performance.
- Regular Consumable Inspection and Replacement
Frequently check your contact tip, nozzle, and gas diffuser (if used). Replace contact tips before they become excessively worn or oval-shaped, as this is a primary cause of wire jamming and burnback. Keeping these front-end components clean and correctly sized for your wire is crucial.
- Use Correct Drive Rolls and Maintain Proper Tension
Always ensure the drive rolls installed in your feeder match the specific diameter and type (e.g., V-groove for solid, U-groove for cored/soft wires) of the welding wire you are using. Set the tension according to manufacturer guidelines – just enough to feed consistently without crushing or deforming the wire. Incorrect rolls or tension lead to slippage or wire damage.
- Scheduled Liner Maintenance and Replacement
The gun liner is a common source of friction. Periodically blow it out with clean, compressed air (from the gun end towards the feeder). More importantly, replace liners regularly based on usage, not just when problems occur. A worn, dirty, or kinked liner drastically increases drag on the wire. Always use the correct liner size.
- Maintain Straight Gun Cable Routing
Avoid sharp bends, kinks, or tight coils in the welding gun cable during setup and operation. The straighter the path the wire has to travel through the liner, the less friction it encounters. Utilize boom arms or ensure adequate slack to minimize severe bends, especially critical for softer wires or longer gun cables.
- Proper Wire Storage and Handling
Protect your welding wire from moisture, dirt, and physical damage. Store spools in a clean, dry area, keeping them covered when not in use to prevent contamination like rust or workshop dust accumulation. Handle wire carefully during installation to avoid kinks or tangles on the spool, which can cause significant feeding resistance. Using quality wire from reputable suppliers also contributes to smoother feeding.
Wire feed issues in welding operations can be managed by understanding symptoms, potential causes, and applying a systematic troubleshooting methodology. Consistent feeding is crucial for arc stability, weld quality, and productivity. Preventative maintenance practices like consumable replacement, drive roll setup, liner care, and wire handling minimize disruptions. This leads to better welding outcomes and operational efficiency in Canada’s industrial and fabrication sectors.
For specialized support and high-quality welding gases and supplies in the Toronto area, consider contacting Josef Gases at (416) 658-1212 for assistance.


")


